
Welcome to our online onboarding process for compressed air sensors! This guide will walk you through the steps to share the necessary information with our onboarding team so we can send you the appropriate hardware.
How It Works
Your onboarding representative will initiate the online process for you. Follow the steps below to complete the process :
Step 1: Check Your Email
- You will receive an invitation email. Please make sure to check your inbox and spam folder in case the email lands there.

Step 2: Create Your Account
- Open the email and click on the Create Account button.
- Set a password for your account.
- Log in to your account.
Step 3: Verify Company Details
Once logged in, you'll need to check your company details.

- VAT and PO Numbers:
- You don’t need to enter the VAT and PO numbers at the start.
- The VAT number is required only for companies in the EU.
- The PO number is optional—smaller organizations may not use it, but larger organizations typically require it for invoicing.
- Invoicing Address: This is required to complete the onboarding process.
- Shipping Address: Only configure this if it’s different from the regular address.
Step 4: Invite a New Team Member (Optional)

If you'd like to invite someone else from your team, you can assign them specific roles based on what they need to be updated about. This helps us reach the right people and avoid unnecessary calls (e.g., calling the CEO for irrelevant updates).
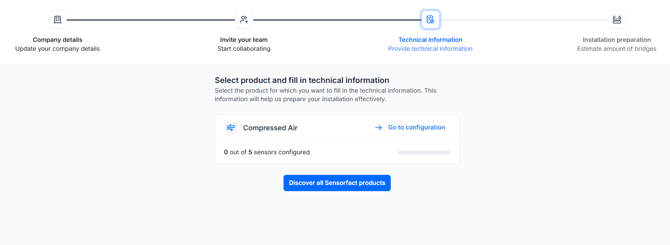
Step 5: Provide Technical Information
1. Click on Go to Configuration to begin configuring your assets.
2. Your onboarding representative will have pre-set the hardware details for you.
System settings:
- Name Your System: Give your compressed air system a unique name.
- Technical Drawing: Upload the technical drawing of the system.
Note for multiple systems: At the moment, it is not possible to add multiple systems through the online onboarding. If you have multiple monitored systems, please send an email to your onboarding representative including:
-
- Technical drawings
- System names
- Sensors belonging to each system
Our team will update the structure on our end before shipping.
Configure Your Assets:
-
- Sensor Name: Give your sensor a unique name for the measuring location.
-
- Photo of the Pipe: Upload a clear photo of the pipe at the installation site.
- Pipe Parameters (Inner and Outer Diameter): The inner and outer diameters must be exact measurements. The accuracy of these measurements directly impacts the quality of the data collected by the sensor.
- Pipe Material: Use the drop-down menu to enter the relevant pipe material for the measuring location.
- Minimum required straight pipe length: This field will automatically populate once the diameter fields are completed. It represents the minimum required straight pipe length for a correct installation.
- Distance to the closest power outlet: Confirm whether the sensor will be within 5 meters of the nearest free power outlet.
- Additional Notes: Provide any extra details or specific features regarding the measuring location.
Step 6: Review and Save Changes
After making your final adjustments, click on Save Changes and Request Review.
Important: After you request a review, our onboarding team will verify the details. You will no longer be able to make changes.
Step 7: Shipment and installation
Your onboarding representative will verify the data, confirm the necessary hardware, and contact you to arrange the shipment and installation of your hardware. By following these steps, you’ll be able to smoothly onboard and prepare for your setup.
If you have any questions, don't hesitate to reach out to your onboarding representative.