Welcome to our online onboarding process for gas services! This guide will walk you through the steps to share the necessary information with our onboarding team so we can send you the appropriate hardware.
How It Works
Your onboarding representative will initiate the online process for you. Follow the steps below to complete the process :
Step 1: Check Your Email
- You will receive an invitation email. Please make sure to check your inbox and spam folder in case the email lands there.

Step 2: Create Your Account
- Open the email and click on the Create Account button.
- Set a password for your account.
- Log in to your account.
Step 3: Verify Company Details
Once logged in, you'll need to check your company details.

- VAT and PO Numbers:
- You don’t need to enter the VAT and PO numbers at the start.
- The VAT number is required only for companies in the EU.
- The PO number is optional—smaller organizations may not use it, but larger organizations typically require it for invoicing.
- Invoicing Address: This is required to complete the onboarding process.
- Shipping Address: Only configure this if it’s different from the regular address.
Step 4: Invite a New Team Member (Optional)

If you'd like to invite someone else from your team, you can assign them specific roles based on what they need to be updated about. This helps us reach the right people and avoid unnecessary calls (e.g., calling the CEO for irrelevant updates).
Step 5: Provide Technical Information
- Click on Go to Configuration to begin configuring your assets.
- Your onboarding representative will have pre-set the hardware details for you.

Configure Your Assets:

- Name Your Asset: Give your asset a unique name.
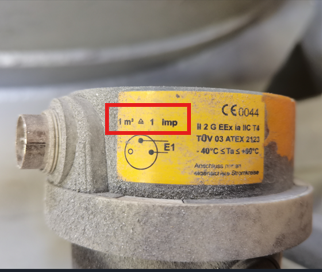
- Impulse Coefficient (imp/m3): Is the conversion factor that determines how much volume relates to one pulse. You can find this information on the meter or pulse generator:

- Meter type and brand: To finalize our pulse analysis, we need to know which meters you want to measure.
- Photos: Please upload clear photos of each meter’s plate and connection terminals. You can follow our guidelines for the pictures in this document: Guidelines for meter pictures.
Step 6: Export Asset List (Optional)
You can export the asset list to share with other stakeholders. To do this, click on the Export button.
Step 7: Review and Save Changes
After making your final adjustments, click on Save Changes and Request Review.
Important: After requesting review, our onboarding team will verify the details. You will no longer be able to make changes.
Step 8: Installation
Your onboarding representative will contact you to arrange the installation of your hardware.
By following these steps, you’ll be able to smoothly onboard and prepare for your hardware installation. If you have any questions, don't hesitate to reach out to your onboarding representative.